


3D embroidery could be a special and eye-catching strategy that can take your weaving ventures to the following level. By including measurement and surface to your plans, 3D Embroidery makes a staggering visual affect that’s beyond any doubt to inspire. In this direct, we are going walk you through the essentials of 3D Weaving, how to get ready your materials and plan, step-by-step enlightening for making 3D Embroidery, investigating common challenges, and imaginative thoughts for utilizing this procedure in your ventures.
Understanding 3D Embroidery Basics
3D Embroidery changes the conventional craftsmanship of embroidery by including profundity and surface, making a material and outwardly engaging impact. At its center, this strategy is almost layering fastens on one another to make plans that pop out from the texture. Utilizing a assortment of fastens, strings, and indeed consolidating distinctive materials can encourage upgrade the dimensionality of your work. Authority of 3D embroidery starts with experimentation; attempting out different fasten sorts, such as the cushioned glossy silk fasten or the complex bullion hitch, permits for the advancement of interesting surfaces that contribute to the in general 3D appearance. Each choice in string sort and color, at the side the vital layering of fastens, plays a vital part in bringing your plans to life in a way that conventional, level weaving cannot accomplish.
Preparing Your Design and Materials
To kick off your 3D Embroidery project, first assemble all the essentials: an embroidery hoop to keep your fabric taut, the fabric of your choice, a selection of embroidery threads that match or contrast your design vision, needles appropriate for the threads and fabric, and any special embellishments like beads or sequins that you wish to add. When choosing a design, think about how it can showcase the 3D qualities you’re aiming for. Flowers with petal layers, animals with fur texture, or abstract geometric patterns work exceptionally well for adding depth. Visualizing your end goal in terms of color and texture is crucial at this stage. If you’re drawing your own design, ensure its simple enough for your skill level but allows for creative 3D enhancements. Alternatively, there are plenty of patterns available specifically tailored to 3D Embroidery. Once your design is selected, transfer it onto your fabric using a method that won’t damage or stain the material, setting the stage for your 3D embroidery journey.
Step-by-Step Instructions for Creating 3D Embroidery
Secure your fabric tightly in the embroidery hoop and transfer your chosen design onto the surface. Begin by choosing a vibrant thread color that contrasts well with your fabric, enhancing the 3D effect you’re aiming for. Outline your design with a backstitch or running stitch to clearly define its edges. Utilize a satin stitch or its padded counterpart to fill in larger areas, carefully layering to build up volume. For texture and intricate detail, incorporate specialized stitches like French knots, bullion knots, or a loop stitch, focusing on areas where you want to emphasize depth. As you work, layer your stitches thoughtfully to cultivate the desired three-dimensional effect, paying close attention to the height and texture differences among various sections of your design. Proceed with your embroidery, adding layers until you are satisfied with the 3D appearance, then carefully remove your work from the hoop, trimming any loose threads to finalize your piece.
Troubleshooting Common 3D Embroidery Challenges
Navigating through the intricacies of 3D Embroidery, crafters might encounter a few hiccups such as uneven stitch heights, thread fraying, or the design not achieving the expected relief. When stitches don’t align to the desired depth, reevaluate your layering technique and consider increasing the number of threads in your needle or adding another layer of stitches for enhanced elevation. Thread fraying often results from excessive tension or the use of sharp-edged beads and sequins. To prevent this, use a thread conditioner and opt for smoother embellishments. If your design lacks the anticipated 3D effect, reassess the variation in stitch length and type across different sections of your artwork. Experimentation on scrap fabric can be invaluable for refining these techniques before applying them to your final piece, ensuring a smoother embroidery process.
Creative Ideas and Applications for 3D Embroidery
The realm of 3D Embroidery opens up a world of possibilities for personalizing and enhancing everyday items and special projects alike. Transform plain garments into unique, texture-rich masterpieces by adding 3D floral motifs to collars and cuffs, or elevate a basic tote bag with voluminous abstract designs. Home decor benefits greatly from the added depth 3D Embroidery brings; imagine plush cushions adorned with raised patterns or wall art that literally stands out, creating engaging focal points in any room.
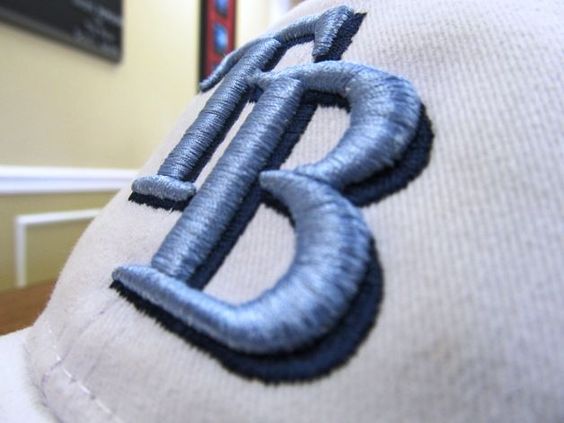
Accessories like hats and scarves can also serve as canvases for your 3D creativity, turning functional items into expressive art pieces. Past texture, consider applying 3D embroidery to flighty materials such as canvas for mixed-media craftsmanship or calfskin for luxe, material extras. The integration of dots, sequins, and indeed little texture pieces can present extra layers of surface, making each extend really one-of-a-kind. This procedure permits for perpetual experimentation, empowering embroiderers to thrust the boundaries of conventional weaving and investigate modern measurements of their make.
Conclusion
3D Embroidery offers a unique opportunity to add dimension and intrigue to your embroidery projects, transforming them from flat to fabulous. This technique requires a blend of creativity, skill, and patience, but the end results are truly remarkable. As you delve into the world of 3D Embroidery, remember that each project is a chance to explore new textures, colors, and stitches. Whether you’re enhancing your wardrobe, personalizing home decor, or creating one-of-a-kind gifts, 3D Embroidery allows your designs to literally stand out.
Facing challenges along the way is part of the learning process, so embrace them as opportunities to refine your skills and push the boundaries of traditional embroidery. With the guidelines provided in this guide, you’re well on your way to mastering the art of 3D Embroidery and making your embroidery projects pop with life and texture. Now is the perfect time to gather your materials, let your creativity flow, and embark on your 3D Embroidery adventure.